Thursday, November 4, 2010

Royal Blog Tour

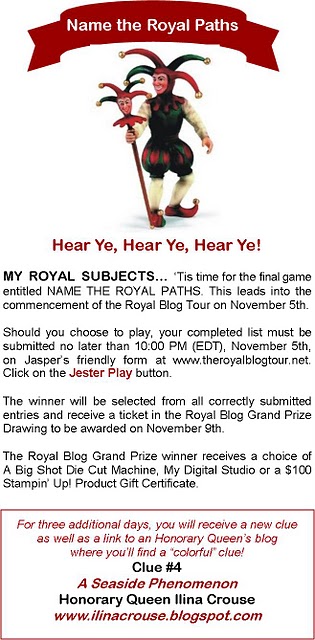
Hello and welcome to my castle. I would like to introduce you to the stamp set, Party Hearty.  I chose this stamp set, because it is a very versitale group of stamps.
To show you some of the things you can do with Party Hearty, I created a paper bag album using the mini lunch sacks in the Holiday Mini Catalog.  I simply left them flat and bound them at the ends.  Also because the sacks are brown, I used white paint and painted all of their edges brown.
For the cover, I used the pieces of  chipboard that came with the lunch sacks, and covered them with card stock and designer paper.
I used the designer paper, Celebrations, to decorate the album, and I used the cupcake image from Party Hearty, as the main focal point on the cover.  It is hard to tell in the picture, but the icing in the cupcake is covered with glitter.
Below you can see the inside of the album.
The banner on the first page was created using the party hat stamp.  I simply cut them out and turned them upside down.


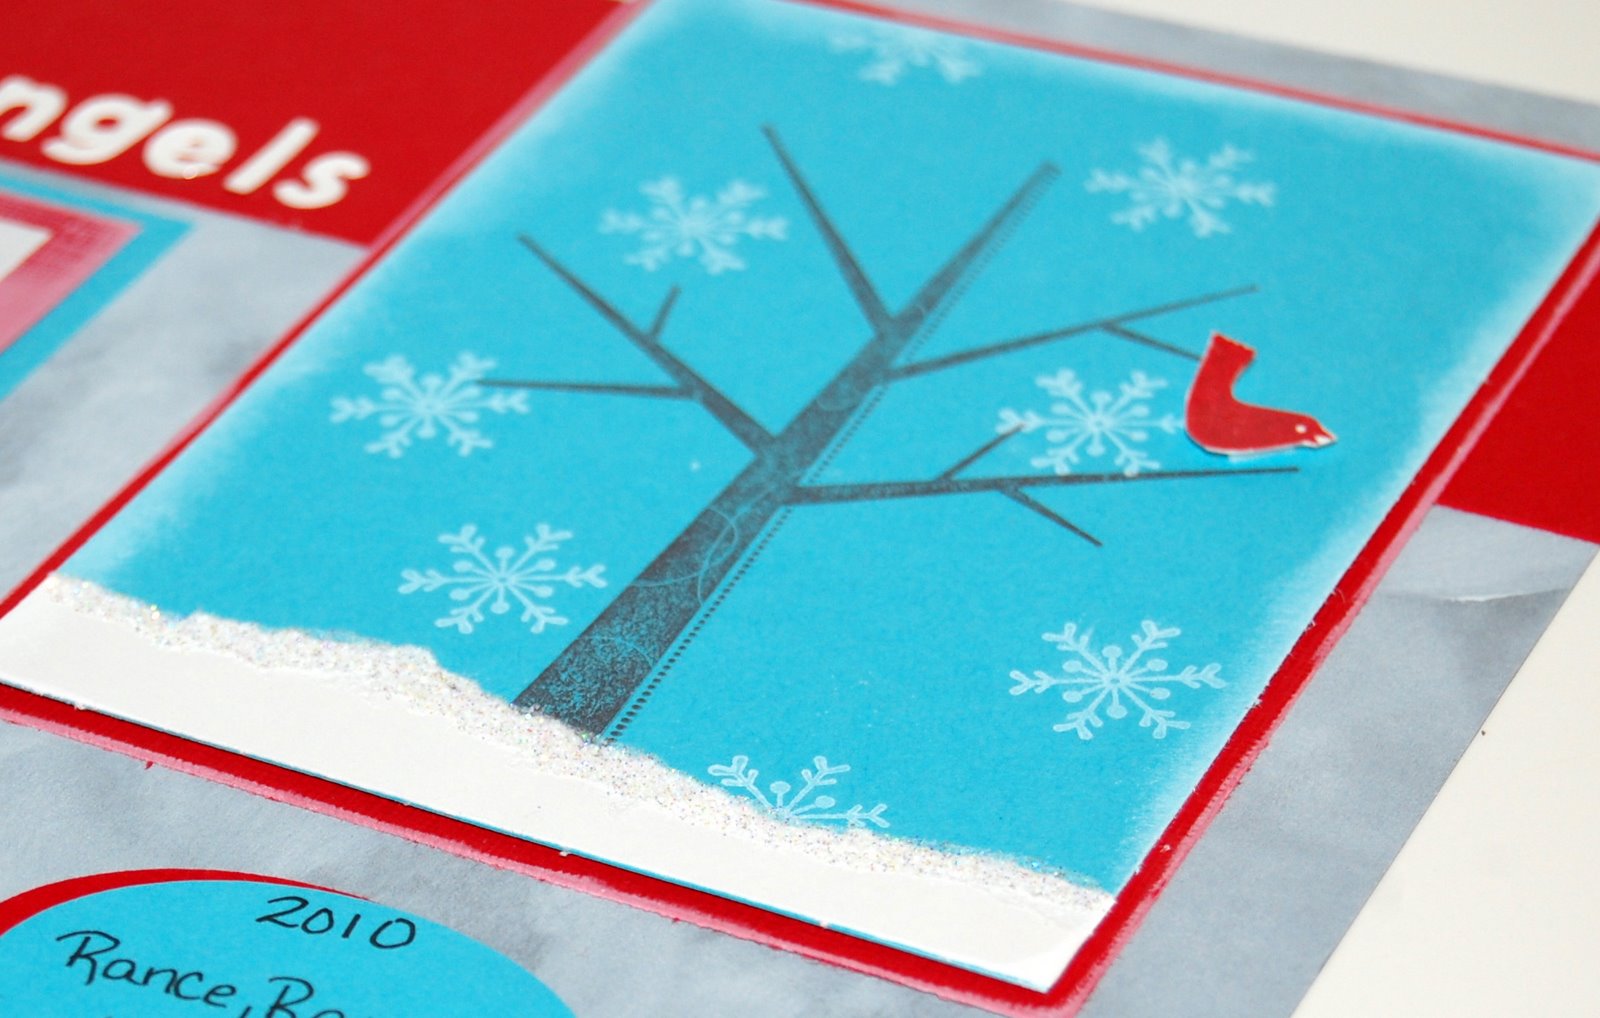
The red circles on these two pages are the inside circle on the b is for birthday stamp.  I used a real red marker to ink up just the circle and then cut it out with the 3/4 inch circle punch.

                                       
Below are  the tags I made to go inside the paper bags.  You can use them for more pictures and/or for journaling.
Notice the blue ribbon on the red tag.  Stampin' Up doesn't make that color ribbon, but they do make white ones.  Come back onTuesday the 9th, and I will show you how I changed the ribbon from white to pacific point.

Blog Candy!!!!!!

I am offering up this album as blog candy!  All you have to do is email me your name and email address and leave me a comment below.  I will let you know on Tuesday who the winner is.
Thanks for visiting my castle and enjoy the rest of the tour.


Sunday, October 31, 2010

2nd RBT Clue

Card for Stamp Club

This is the card my stamp club made this month.  I have seen a few versions of this, but as far as I know, Doris Denman was the first to create this acorn using the ornament punch.  Yes, I got this idea from Stampin' Connection.  It is a great place to go for inspiration, but like I said before you have to be a Stampin' Up! demonstrator to be a member of the site.

I almost didn't show this card because I messed up on his cheeks, but at least I knew what to tell my club girls how NOT to do them.  I usually always keep my mistakes to show them so they'll know what to not do.
The two main colors in this card are more mustard and cajun craze.  The leaves are cajun craze, more mustard, old olive, riding hood red, and early expresso.  The large acorn is made from soft suede and early expresso.
Thanks for stopping by and please leave a comment,
Patty Mickle
Stampin' Up Demonstrator
Shop Online 24/7
Posted by Picasa

Friday, October 29, 2010

Stamp Club Scrap Page

This is the scrap page that my stamp club made this week. I cased it from Anita C. Haines on Stampin' Connection.
This is not a very good picture. It looks much better in person. The colors are much richer than they show here.


Thank you for stopping by and please leave me a comment,
Patty Mickle
Stampin' Up Demonstrator
Shop Online 24/7
Posted by Picasa

Sunday, October 24, 2010

Stinkin' Cute Halloween Card

I just love this card.  It is so stinkin' cute if I do say so myself.  I must admit that I cased almost the entire card from fellow demo, Holley Smith.  I did add an extra pumpkin and changed the sentiment, but other than that everything else is pretty close to the same as hers.
I love Stampin' Connection.  That is where I saw her card, and I knew right away I had to create one of my own.  If you are not a demo, you need to click here and get signed up right away so you too can visit Stamping Connection.  It is a great place to get  ideas, answers, and all kinds of information relating to being a demonstrator.

This card shows how versatile the owl punch is. Here it is a bat and a ghost.  Every thing on this page was created using  some kind of punch.  I also used the big shot on the background piece.  I don't have a single sheet of Halloween designer paper, but I didn't need any to create this cute Halloween card.
This card front would also go great on a scrapbook page. Hmmmm.  I may have to do that.
Thanks for stopping by and please leave me a comment,
Patty Mickle
Stampin' Up! Demonstrator
Shop Online 24/7


Posted by Picasa

Saturday, October 23, 2010

Scarecrow card - my version

Ever since I first saw Doris Denman's scarecrow card on Stampin' Connection, I have been wanting to try one myself.  I just couldn't figure out how to recreate certain parts because I don't have some of the stamps that she used.  Then yesterday I ran across Monika Davis' blog and her scarecrow box and she had figured out how to do some of the things that I couldn't figure out.  Therefore, my scarecrow is a compilation of ideas from Doris Denman and Monika Davis.    

I like my card, but I feel he is missing something.  I should have stamped his hat, but I am really tired and didn't think of that until it was too late, and I am too tired to change it now.  Oh, well after I post this I will finally realize what else he is missing.  It often takes me seeing it online to see what I should have done or to see on what I made a mistake.  When I figure out what else he needs and/or  after I fix his hat, I'll repost him to show you the difference.
Until then, thanks for stopping by and please leave me a comment,
Patty Mickle
Stampin' Up! Demonstrator
Shop Online 24/7


Posted by Picasa

Friday, October 22, 2010


Create Amazing cards, Beautiful packaging, and Cherished gifts this holiday season!

From October 19-December 16, choose from several different holiday bundles containing gorgeous Stampin’ Up!® products—perfect for creating cards, gift packaging, and gifts—and all at 20% off!
 
Bundles at a glance:
Vintage Christmas Card Bundle
Contempo Christmas Card Bundle
Gift Packaging Bundle

Simple Adorned Gift Bundle

Tags Til Christmas Bundle

Frame Gift Bundle


Thursday, October 21, 2010

French Foliage 3D

I cased the base of this card from  Charlene Boyachek  on Stampin' Connection, a website for Stampin' Up! demonstrators.  I just love the stamp set, French Foliage.  I love how realistic you can make the leaves appear.  The secret to making realistic leaves is 1)stamp onto very vanilla card stock and 2) fill in the white areas with some color after cutting out.  After I did that with my leaf I put it face down on my Versamark ink pad and covered it with the ink.  I then sprinkled it with clear embossing powder and heat embossed it.

Because this card is a 3x6 card, I used Stampin' Up!s small open end envelopes (107286 p. 171)  I like making cards that aren't the typical 4 1/4 x 5 1/2.


Thanks for stopping by and please leave me a comment,
Patty Mickle
Stampin' Up! Demonstrator
Shop Online 24/7
Posted by Picasa

Tuesday, October 19, 2010

Another scrapbook page

I am still at the scrapbooking.  Instead of stamping on this page, I stencilled.  I made a stencil  when I die cut the flower with the daisies #2 die and the bigshot.  I used the stencil and whisper white ink to created the flowers across the top of the page.

On the title, it is hard to tell in the picture, but I layered the letters on top of each other with dimensionals to create a 3d effect.


Expect to see more layouts with that same sweet baby in them.  I took several pictures of her the other day, and now I am scrapbooking a set of them for her mother and a set for myself. (They are niece and my great-niece.)
Thanks for stopping by and please leave me a comment,
Patty Mickle
Stampin' Up Demonstrator
Shop Online 24/7
Posted by Picasa

Sunday, October 17, 2010

Halloween Layout

I love fall.  It is one of my favorite times of the year, and one of the things I love about it is all the rich vibrant colors.  I tried to convey those colors on this layout.  Also, I don't have any Halloween dsp so I improvised and used what I had.  It is hard to tell from the photo, but I did a lot of distressing on this page with the Distressing Essentials kit.  That kit has everything you need, including inks, to distress your project.

Notice my cute little owl in the corner.  It is my first time to make him, and I used the two-step owl punch.  It has everything you need to make him in one punch.  How cool is that?!

Thank for stopping by and come back soon.  I am sure I will be continuing my scrapbooking kick I am on with a few other projects thrown in here and there.
I would love for you to leave me a comment,
Patty Mickle
Stampin' Up! Demonstrator
Shop Online 24/7
Posted by Picasa

Friday, October 15, 2010

Snow Angels

I have been scrapbooking like crazy lately.  I just now got around to scrapping pictures of us playing in the snow last winter.  That is me with the silly dog sitting on top of me.  We had a dog sweater on her, but she kept taking it off somehow.
I started this layout by using the faux suede technique on the basic gray card stock.  I like how the whisper
white ink on the gray card stock gives it a wintery feel.  It reminds me of dark winter clouds.
 
It is hard to tell from the photo, but I added glitter to the snow beneath the tree.


Thanks for stopping by and please leave me a comment,
Patty Mickle
Stampin' Up! Demonstrator
Shop Online
Posted by Picasa

Wednesday, October 13, 2010

Giant Sized Punch Art

I have been on a roll the last few days scrapping this year's school pictures.  My husband is a teacher so of course I had to scrap his too.  I combined directions from a couple of different sites to come up with my punch art.  No ones punch art was as big as I needed mine to be so I just modified their directions  to make mine bigger.
I got the idea for the books from Flowerbug, but actually used her directions for another card on how to make them. (I know clear as mud).
I had to make up the apple based on several different directions I saw on the internet.
Overall, I like how the page turned out. 

Thanks for stopping by and please leave me a comment,
Patty Mickle
Stampin' Up Demonstrator
Shop Online
Posted by Picasa